Wednesday, 21 March 2018

Old Wise Trees

Old Wise Trees


The Retro Rubber Challenge #82 is a theme challenge #rrcb82 which is "tic tac toe!"  Where as designers we have to choose three elements across, down or diagonally.  For my design I chose "PINK, THANKS & EMBOSSING".  My card design is below.  The stamp I used is again from a lady from my Shared Craft group who used to stamp in the past but no longer wants to, so she passed on her collection of stamps to lucky me.  So without upsetting this lady (I am not going to mention her age) but lets just say that all the stamps she gave me were older than 1 years old.


To create my design initially I found a White ready-made card base (5 x 5") in my craft stash.  I then found a piece of Pink card stock in my scrap folders and cut this down to measure (5 x 4").  I put this through the Big Shot in the Stampin' Up Ruffled embossing folder.  I then adhered this straight to the White card base with snail adhesive.

I then got a piece of White card stock from my scrap folders and cut this to measure (4 1/2 x 3 1/2"), I dragged Stampin' Up Pool Party ink across this card stock horizontally creating a background.  Then I used Memento Dewdrop Black ink to stamp 3 images of the tree.  This was adhered on top of the Pink card stock using foam pads.  

Next I looked in my ribbon basket and I found a Dark Pink (3/4") ribbon a very similar colour to that of the embossed piece of card stock.  I wrapped this around the left-hand side of the card stock inside and then in the middle on the outside I tied a flat knot and cut the tails off short.  

Finally came the sentiment, I found a large 'Thank You' stamp in the Stampin' Up Delightful Daisy stamp set.  I stamped this onto a scrap piece of White card stock using Black Memento ink.  Then trimmed the sentiment to measure (3 1/8 x 1").  This was adhered to the bottom of the card base with snail on the stamped image and foam pads at the bottom so that it laid straight.  This completed my project.

I would love to know what you think about my projects, so please leave a comment.  Thank you.

Till next time, keep crafting!


Lorraine

:o)

Sunday, 18 March 2018

Spring Time Button Florals

Spring Time Button Florals


My project that I submitted for this Colour Challenge is:


To create my project I first found that I had already a beautiful Blue ready-made card base which was very close to the colour Berrylicious shown above.  This measured (5 x 5")  I then went looking in my craft stash to see what I could add to this to create my project.

I found I had a floral stamp with a button image in the centre.  So I thought it might be quite fun to stamp the floral image and then sew an actual button onto it.  With a light coloured ink (Basic Grey - Stampin' Up) I stamped 8 flowers on White card stock using my stamp positioner tool.  I also stamped two of the same images inside the card at opposite corners and I stamped another in the bottom right-hand corner of the envelope.  Whilst I had the ink out I stamped 'Happy Mail' in the top left-hand corner of the envelope too.

Now for the colour on the stamped images.  Firstly I fussy cut all the images out.  I then used my Spectrum Noir Alcohol markers Orange (OR2, OR3); Blue (BT6, BT8); Green (GT2, GT3) and the colourless blender marker too. Using the darker of the alcohol markers in the middle of the flowers and slightly on the start of the petals, then blending the lighter colour from this to the edges of the petals.  Then I used the colourless blender marker to lighten the very tips of the petals.  I went around the cut edges of the stamped images with the light coloured alcohol marker to take away any white that was left from the card stock it was printed on.  I also coloured on the underside of the petals with the same light markers too.  

Next I found 8 Yellow buttons in my craft stash and I sewed these to each flower centre with light Green Embroidery thread, tying a knot at the front.  I then curled the edges of the petals upwards with my bone folder.  To finish off the flowers I added some 'Wink of Stella' to make them sparkle a little.  

In my craft stash I found a rustic looking ready-made sentiment 'Happy Birthday' which was ideal for this project.  I adhered this to the centre of the card base with foam pads.  Then I adhered the flowers around the sentiment using wet glue straight to the card base.  This completed my project.

I would love to know what you think about my projects, so please leave a comment.  Thank you.

Till next time, keep crafting!


Lorraine

:o)

Birthday Balloons

Birthday Balloons

MFTs Sketch Challenge #376 this week is as below:


My project I have submitted for this Sketch Challenge is this:


To create my project first I found a silver ready made card base in my craft stash (6 x 4 1/4").  I am trying to use up my ready made card bases because I bought these when I first started crafting before I learnt how to make card bases.  Then I went to my blue scrap Card Stock/Designer Series Paper (DSP) folder and found two pieces of DSP; one with horizontal stripes and on the opposite side it had a floral pattern.  I decided that these would look great as the layers on the project.  I trimmed the horizontal piece to (6 x 1 3/4") and the floral piece to (6 x 1 3/4").  I adhered the two pieces together with snail adhesive leaving (1/2") of the floral piece of DSP further out of the left-hand side of the vertical lined piece of DSP.  Then, I did something I haven't done yet as a crafter - I TORE!  I tore the DSP from the top to the bottom; leaving the torn edge.

I then adhered these two pieces of DSP to the card base using snail adhesive, the torn edge of the DSP was (3/4") from the left-hand folded edge of the card base.  Then I had to decide what to do for the circle from the sketch.  I went to my craft stash to see what I had or what I could stamp.  I found two balloons, one blue and one red which I had already die cut using my Big Shot but hadn't used yet.  The red gave a 'pop' of colour on the card base against the blues.  So I tied some Black embroidery thread around the bottoms of the balloons and secured this underneath the DSP.  Then I adhered the Red balloon straight onto the DSP with snail adhesive and then put the Blue balloon on top of the Red balloon slightly using foam pads.  

I found a ready-made sentiment "Happy Birthday" in my craft stash and adhered this with wet glue onto the Blue balloon.  Inside the card I adhered a large "Happy Birthday" die cut that I also found in my craft stash.  Onto the envelope I stamped 'Happy Mail' and adhered 3 candle pop stickers also that I found in my craft stash.  All in all, this project has helped me to use up some of the resources I had already in my craft stash and that completed my project. 

I would love to know what you think about my projects, so please leave a comment.  Thank you.

Till next time, keep crafting!


Lorraine

:o)

Saturday, 17 March 2018

Bella & Friend

Bella & Friend


Color Throwdown #484 is a Colour Challenge to include the colours as above.  My project for this challenge is below. 


To create my project I first found a (5 x 5") White ready-made card base in my craft stash.  I then cut a another piece of White card stock measuring (4 3/4 x 3 1/2"), on this I stamped stems and leaves of different flowers from the 'Delightful Daisy' stamp set in Memento Cottage Ivy ink.  I used my stamp positioner tool in order to get a good clear image.  After stamping all the greenery, including some inside the card and on the envelope too to continue the theme throughout I then stamped all the flowers in Memento Elderberry ink.  Next I ran this piece of card stock through my Big Shot in the brick embossing folder.  To get a more positive wall effect, I then used my sponge dauber with Memento Grey Flannel ink across the embossed card stock.

I measured where the top of the wall was going to finish on the front panel of the card base and I marked this lightly with a pencil.  Then with a stamp from 'Bella & Friends' I inked up the turtle in Memento Cottage Ivy and Bella with Stampin' Up Basic Grey ink and stamped this image just above my pencil marks.  Next I rubbed out the pencil marks.  I then used JG5 Spectrum Noir Alcohol marker to fill in parts of the turtle and BP7 Spectrum Noir Alcohol marker to define Bella's collar and heart pendant.  I then stamped the sentiment 'HAPPY BIRTHDAY' in Memento Elderberry ink in the top left-hand corner of the card base.

Finally the embossed card stock had to be adhered to the card base.  I used foam pads to do this in order to get some dimension on the card.  This completed my project.  

I would love to know what you think about my projects, so please leave a comment.  Thank you.

Till next time, keep crafting!


Lorraine

:o)


Harley With Love x

Harley With Love x


Firstly I want to thank Sandi Maclver for her video tutorial on her YouTube channel demonstrating how to put together a Rectangle Pop-Up Box Card which will fit into an A2 envelope.  To understand how to put this project together please follow the link to Sandi's video tutorial and for all the measurement follow the link I have set up to Sandi's Blog Page, thank you.  

Ok now I will let you know how I decorated my project.  This project is for my hubby's 50th, he has a Harley Motorbike called Holly and some days I do think he loves her more than me, but hey ho after 29 years of marriage you have to give him some pleasures.  I recently purchased the 'One Wild Ride' stamp set from Stampin' Up (which was designed by Dawn Griffiths, a Stampin' Up Demonstrator) who I believe her hubby also owns a Harley.

I constructed my rectangle box card using Basic Grey card stock, that included the two little inserts for the centre.  I found some Designer Series Paper (DSP) in my craft stash that was black with a pattern which I thought looked a bit like tyre track marks.  This I used to decorate the front and side panels and the top and underneath of the two side flaps.  On the back panel I decorated this with Black card stock. All the card stock was adhered straight to the box using snail adhesive.  On the back of the back panel I put a piece of Black card stock and a smaller piece of White card stock also adhered straight to the box card stock with snail adhesive.  The White card stock gave me somewhere to write my greeting.  In my craft stash I had silver stickers which I used for the  'Happy Birthday' sentiment and the '5' and '0'.  I cut the 'th' out of the middle of another 'Birthday'  These stickers are useful to have in your craft stash for when you only have small area for a sentiment or your want a sentiment to stand out a bit on your project. 

Now for the stamping.  I stamped on Basic Grey card stock to match the box card base.  I also used my stamp positioner tool so that I could stamp more than once ensuring that I got a good image.  I stamped the large badge and fussy cut this out to adhere to the front panel flat using snail adhesive.  On two small Basic Grey squares I stamped the grit randomly to cover these panels, these were adhered to the DSP with snail adhesive.  I then stamped 2 small badges which were fussy cut out and adhered to these side panels using a foam pad.  Now for the main star of the show, the middle of the box card.  I first stamped a tyre track and cut this out and adhered this to the front insert (just on the very bottom so it stood proud up above the front panel edge).  I then stamped the banner which said "Born to Ride" and fussy cut this out too and adhered this with snail adhesive on a few areas so that it would sit on top of the tyre track.  Finally I stamped out the Harley motorbike.  Again I fussy cut this out and adhered the bottom of it to the back insert with snail adhesive.  (I made sure that it came up above the top of the banner).  My final embellishment to this project was to cover the metal parts of the Harley with Wink of Stella to give it some shine and bling!  This completed my project.  

I would love to know what you think about my projects, so please leave a comment.  Thank you.

Till next time, keep crafting!


Lorraine

:o)

Double It Up!

Double It Up!

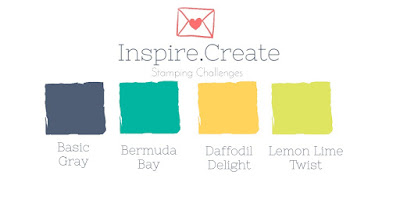
Inspire.Create Card Challenge this week is a Colour Challenge #013 with the Stampin' Up Ink colours above.  I wanted to use a piece of my Designer Series Paper (DSP) in my project as I have promised myself to use this more in order to use up my stash.  So whilst making one card I used up pieces that were left over to create a second hence my title - Double It Up!


To create my projects, first I found two White (5 x 5") ready-made card bases in my craft stash, which were ideal.  I then with my trimmer cut a piece of Basic Grey card stock (4 3/4 x 4 3/4") leaving a small border of white all around each edge.  Next I cut a piece of Daffodil Delight card stock (4 1/2 x 4 1/2") again leaving a small border.  I did not cut the DSP until I had coloured it in and it was completely dry.

So for the DSP, it had two tones of grey flowers already on it and some white ones too. So with my Stampin' Up inks (Daffodil Delight, Bermuda Bay and Lemon Lime Twist) and my Aqua pen I coloured different parts of the flowers randomly.  

Then with my trimmer I cut two pieces of Black card stock (4 1/4 x 2 1/2").  On my Adorable Scoreboard I scored in every notch which I believe is (1/8th gaps).  With my trimmer I cut the DSP which was dry down to ( 4 1/4 x 2 1/4") and adhered this with my snail adhesive straight on to the Daffodil Delight card stock.  One piece at the top and the other at the bottom creating two different looks to my design.  I then adhered the Black card stock the same way, but again opposite to the DSP.  

I adhered a piece of Bermuda Bay ribbon along the join of one of the cards and secured this at the back of the Daffodil Delight card stock.  On the other project I adhered a piece of Lemon Lime Twist ribbon along the join.  Next I adhered the Daffodil Delight card stock to the Basic Grey card stock with the snail adhesive.  With my bow maker I tied two bows one in each colour to correspond with the ribbon across the card and adhered this to the cards with wet glue (put something heavy on top like an acetate block until the wet glue has taken hold).  

Now for the stamping.  I stamped the sentiment 'Thank You' from the Daisy Delight stamp set twice onto White card stock with my stamp positioner tool to get a good clear image with Basic Grey ink.  I then stamped the sentiment '...for your kindness' in side the card.  This again was stamp twice once in each card and this came from the same stamp set as the previous sentiment.  Whilst I had the Basic Grey ink out I stamped my 'Happy Mail' stamp in the left-hand top corner of the envelopes for the recipient.  I then got the three little flower stamp from the set and using a Yellow Aqua marker pen I covered the stamp and stamped down vertically on the bottom left-hand corner of the envelopes.  I did the same inside the card bases but horizontally underneath the sentiment.  When this was completely dry I added 3 rhinestones to the flower middles inside the card bases and drew with an Orange Aqua marker pen the middles of the flowers on the envelopes (I did not want anything bulky on the front of the envelopes due to postage).

Whilst I had my rhinestones out I coloured 6 of these with a Yellow Spectrum Noir Alcohol pen and left these to dry.  I then trimmed my 'Thank You' sentiment to (3 5/8 x 1") and cut a banner end at the right-hand side.  I then on my trimmer cut a piece of Daffodil Delight card stock (3 3/4 x 1 1/8") and again cut a banner end at the right-hand side.  With the snail adhesive I adhered the White card stock banner to the Daffodil Delight ones.  Then again with the snail adhesive adhered the Daffodil Delight card stock banners to the front of the card bases.  One at the top on the Black scored card stock and the other on the bottom, again on the Black scored card stock.  My final embellishment to these cards was to add the coloured rhinestones to the edge of the sentiment banners.  This completed my projects.  

I would love to know what you think about my projects, so please leave a comment.  Thank you.

Till next time, keep crafting!


Lorraine

:o)

Thursday, 15 March 2018

Easter Wreaths

Easter Wreaths

I was asked by the Art Therapist at The Rosewood Centre, Dewsbury District Hospital if I would try and make a couple of different Easter Wreaths that the other patients could make when they came to the centre.

Catherine, (The Art Therapist) gave me two small polystyrene rings.  I search Pininterest for some ideas and decided to do a Easter Flower Wreath and an Easter Bunny Wreath.  I have taken photographs of both the completed wreaths and these are below.


For the Easter Flower Wreath, initially I wound green wool around the polystyrene ring and as I reached the end I cut a green piece of ribbon which I glued to the polystyrene ring before finishing the rest of the wool.  

I then used my flower and leaf dies on the Big Shot and cut different flower and leaf shapes out of fun foam in a variety of colours.  I then glued these in an arrangement at the bottom of the ring.  I stamped an Easter sentiment on yellow card stock and glued this to the back of the ring so that it could be seen from the front in the centre of the ring.  This completed this project. 


For the Easter Bunny Wreath, I wound brown wool around the whole polystyrene ring.  Using my Big Shot and dies, I then cut 2 large brown card stock ovals for the ears and 2 smaller pink fun foam ovals for the inner ears.  These were glued together and left to dry.   I cut 2 small brown card stock ovals for the feet and 2 small pink fun foam circles for the pink pads.  Finally I cut 6 very small pink fun foam circles for the toe pads.  The pink circles were adhered to the brown ovals and left to dry.

I stamped an Easter sentiment on yellow card, this was glued to the back of the polystyrene ring.  I then adhered the 2 brown ears either side of the brown wood loop (to hang the Wreath up with) at the back of the ring.  Then I adhered the 2 small brown feet to the front bottom of the ring.  This completed this project.

I would love to know what you think about my projects, so please leave a comment.  Thank you.

Till next time, keep crafting!


Lorraine

:o)

Watercolour Masterpiece (Hee Hee!)

Watercolour Masterpiece (Hee Hee!)

Our Stampin' For All Face Book Group Sketch Challenge were set a sketch challenge by Amanda Charlesworth.  This is the sketch. 


This is my project created using the sketch.


To create my project I first cut a white card base (5 3/4 x 4 1/4").  I then cut a dark green layer measuring (5 1/2 x 3 3/4") which left a good white border all around the edges.  I adhered the green card stock straight to the card base with wet glue.  I then cut a (3 1/4 x 3 1/4") square out of green spotty Designer Series Paper (DSP), I have promised myself that I will use a much DSP in my project this week.  I cut this square in half diagonally and then adhered the triangles straight to the green card stock layer, one at the left-hand top corner and the other at the bottom right-hand corner.  

Next came the unusual shape, luckily I have a set of dies this shape in my stash, so I took out the largest one and the next one down and die cut a gold frame on my Big Shot with gold foil card stock.  I then used the smaller die and cut out a piece that would fit inside the frame out of watercolour paper.

Next came the stamping.  First I stamped the floral image on the front of the envelope and inside the card base.  I also stamped my 'Happy Mail' stamp on the envelope too and I stamped a sentiment inside the card 'To Someone Very Special'.  Now for the image on the watercolour paper, I used my Embossing buddy first all over the white watercolour paper.  Then I stamped the image with Versamark ink.  I covered the area with white embossing powder and heat set this with my heat gun.  (This is the first time I have done this.)  I then 'smooshed' different coloured inks onto my acetate block and I used my Aqua pen to watercolour the floral image on the watercolour paper.  I allowed this to dry completely.  

I then put foam tape on the back of both the gold frame and the watercolour paper.   This gave some dimension to the overall project.  My project was now complete.


I would love to know what you think about my project, so please leave a comment.  Thank you.

Till next time, keep crafting!


Lorraine

:o)


Flying Happy!

Flying Happy!

Stampin' For All (Face Book Group) set a colour challenge to use Crushed Curry (yellow), Pool Party (blue) and Smoky Slate (grey) in a card design.  Here is my design using these colours.


To create my project first I cut a (5 1/2 x 4") blue card base.  I then cut a (5 1/4 x 3 3/4") layer in grey.  Finally I cut a blue mat which was (5 x 3 1/2").  I cut some scrap card stock into wavy lines (waiting for my cloud stencil to arrive from Simon Says Stamps) and with a sponge dauber I used Pool Party ink to sponge clouds onto the blue mat.  Then I die cut a bunch of balloons out of this mat too.  

I also cut the same die in Crushed Curry and Smoky Slate.  I adhered the grey card stock straight to the blue card base.  I added foam tape to the back of the blue mat as well as across the aperture of the balloons.  I adhered this to the grey layer.  The next job was to jigsaw all the pieces of the balloons back into the aperture onto the foam tape.  The reason why I cut further colours was so that I could use all three colours in the colour challenge in the balloons. With a white gel pen I drew highlights onto the balloons and with a black gel pen I coloured the ends representing the elastic around the bottom of the balloons.  I stamped three sets of birds around the balloons.

Next I stamped the bear out of Stampin' Up 'Cookie Cutter Christmas' in Memento Espresso Truffle and stamped his features in black Memento ink.  Using the punch I punched the shape out and then stamped his ears, cut these out and then adhered them behind his head with wet glue.  I then stamped his bow with Pool Party and punched this out with the punch too.  This was adhered to the bear with wet glue as well.  I put foam tape behind the bear and adhered him to the blue mat so he looked as though he was holding the balloons.  

On a  small piece of Crushed Curry I stamped the sentiment 'Put on a Happy Face!' cut a banner end and adhered this using foam tape.  Obviously, there was plenty of balloons left over, so I put one of each colour inside the card and on the envelope.  Not forgetting, I stamped 'Happy Mail' also on the envelope.  My project was now complete.

I would love to know what you think about my project, so please leave a comment.  Thank you.

Till next time, keep crafting!


Lorraine

:o)

Bella & Pals


My project for this sketch challenge is below.  


To create my project I first cut a Vanilla (5 3/4 x 4 1/4") top folding card base.  I am making a conscious effort to use Designer Series Paper (DSP) in my card designs this week, so I went to see what I had.  I found this fabulous diamond patterned DSP in pink, green and vanilla; which obviously matched the colour of the card base.  So I then got some light green card base to layer the DSP onto.  The green card stock measured (5 1/2 x 4") and the DSP measured (5 1/2 x 3 7/8").  The DSP was adhered to the green card stock with wet glue and the green card stock was adhered to the vanilla card base using foam tape.  I then found a piece of dark pink card stock and thought that it would make a good contrast piece to put down the middle of the card base.  This piece of card stock measured (5 1/2 x 2") and was adhered to the DSP using foam tape.  

Next was it was time for the image/s I cut a (3 x 3") piece of white card stock and using the Stampin' Up stamp set 'Bella & Friends' I stamped Bella the dog three times on this piece of card stock and then I stamped the parrot on the left-hand side.  To stamp the parrot on the right-hand side I had to use my Silicone Craft Mat.  I stamped the image of the parrot directly onto the craft mat and then turned this over and positioned it where I wanted the other parrot and I rubbed the back of the mat gently.  The ink transferred onto the card stock on the right-hand side creating another parrot but flying from the other direction.  I coloured each of these images in with my Prismacoloured Pencils.  I used my black gel pen to outline the images, my white gel pen to put highlights on the dogs' tags and their eyes after the black Nuvo drops had dried.  I put black Nuvo drops onto the dogs' eyes and noses to make them 'pop'.  This was adhered to the dark pink card stock with strong sticky tape.  Before putting my stamps away, I stamped a different image of Bella with another of her friends (the tortoise) onto the front of the envelope and inside the card.  I also stamped 'Happy Mail' onto the left-hand corner of the envelope.

In my stash I found 3 large card flowers which were the right colours for my design but the middles were not the right colour; so I got 3 dark pink buttons from my button tin and sewed these into the middles of the flowers.  These were adhered onto the front of the card base using foam tape due to the weight of them with the button etc.  Finally I stamped the sentiment 'You've got a friend in me', which comes from the Bella & Friends stamp set.  I had stamped this onto vanilla card stock.  I then cut a banner at one end.  I cut two other banners, one in the light green card stock and the other in the dark pink card stock.  I glued the ends together, but then spread them out.  To complete my project I adhered 3 dark pink stars.  This completed my project.

I would love to know what you think about my project, so please leave a comment.  Thank you.

Till next time, keep crafting!


Lorraine

:o)


All The Pinks

All The Pinks


This time The Paper Players Colour Challenge (PP384) is 'Any shade of PINK'.  I am not a 'pink' type of girl but I thought I would give it a go.  I have promised myself that this week on the card challenges I would use as much Designer Series Paper (DSP) as possible in my designs.  My design for this challenge is below.


To create my project first I cut a (5 3/4 x 4 1/4") White side folding card base.  The next job was to look for some DSP but Pink, so I went to my scraps box and pulled out the Pink folder inside was this fabulous dark pink DSP with white stars on it.  The decision was made.  This measured (5 5/8 x 4") leaving a small White border all around the edge.  I adhered this with wet glue straight to the card base.  Inside the scraps folder I noticed some pink rice paper squares and I wondered if I had any white ones.  I looked in the white scrap folder and 'low and behold' there were some white rice paper square in there.  so I took 3 of these and adhered them to the DSP in a diamond shaped pattern.

I had not decided what my image was going to be on this card design because I knew it had to be pink.  So what could I stamp, I did not want flowers (too obvious); so I picked up my Stampin' Up "Magical Day" stamp set thinking that I could stamp the mermaid but instead I stamped 3 dragons!

So I now had 3 stamped dragons which were white at present, I filled my Aqua pens up with water and got my ink storage box out.  I took out all the ink pads that were in any way related to the colour PINK.  I 'smooshed' the inks from these pads onto an acetate block and used my Aqua pen to transfer the ink to the dragons.  When these had dried I outlined them with a black gel pen, added highlights with a white gel pen and the covered the whole images with 'Wink of Stella'.  Each dragon came out a slightly different shade of pink, I was pleased about this.  The darkest pink dragon I attached to the card base on a 'Wobbler' creating an interactive card.  The other 2 dragons I adhered with foam tape either side of the 'Wobbler'.  I then decided to stamp some flames for the centre dragon, coloured this with my watercolour pens and attached it onto the dragon with wet glue.

I stamped the dragon outline inside the card and on the front of the envelope too.  I also stamped 'Happy Mail' in the left-hand corner of the envelope.

Now for the sentiment -  I decided on 'Today is all about YOU!' from Stampin' Up 'Beautiful Peacock' stamp set.  I stamp it with Versamark ink and heat embossed it with white embossing powder on black card stock.  I then cut a banner at one end and adhered it straight to the DSP at the top left-hand corner of the card base.  This completed my project.

I would love to know what you think about my project, so please leave a comment.  Thank you.

Till next time, keep crafting!


Lorraine

:o)

Sunday, 11 March 2018

Beautiful Peacock #2

Beautiful Peacock #2


This being Mother's Day means I have been quite busy with visits from both my daughter (Beckii and her partner Tom) and my son (Joel).  After they had left, I went back upstairs to rest and I looked on my laptop at my emails.  I had an email from Color Throwdown reminding me about the Color Challenge ctd#483 that was closing tomorrow Monday 12th March.  I had not realised that this challenge was due, so I thought I would 'Kill Two Birds With One Stone' as they say because I had another challenge due too which was a Sketch Challenge with MFT.  

So I decided to create the Sketch Challenge but in the colours from the Color Throwdown Challenge (Coral, Green and Kraft).  It is a new stamp set that I have just got through the Sale-A-Bration at Stampin' Up.   I chose this particular stamp set as I have seen so many different designs created with it on Pininterest that I thought it would be very versatile.  I stamped the image in Coral and Green and I chose a designer series paper in Coral and some Green card stock too.  I carried on the colours inside the card and on the envelope.  I think the Kraft card stock A2 (5 3/4 x 4") top folding card base sets of the Peacock as the 'Star of the Show'.   To complete my design I added 5 small pearls to the main tail feathers.  This completed my project.


I would love to know what you think about my project, so please leave a comment.  Thank you.

Till next time, keep crafting!


Lorraine

:o)


Beautiful Peacock

Beautiful Peacock

The MFT Sketch Challenge (MFTWSC375) was to use the sketch below to create a card design.  

So I have just had some new stamp sets delivered and two of these were freebies from the Stampin' Up Sale-A-Bration which runs until the end of March.  I have used the Beautiful Peacock for my image in my design for this Sketch Challenge.  


I initially cut an A2 card from Kraft card stock (5 3/4 x 4").  I wanted to keep the colour combination simple so that the image was the 'Star of the Show'.  So I cut a piece of white card stock (4 1/4 x 2") to stamp the image on and another piece of white card stock (5 1/2 x 3 3/4") for the inside of the card. I always try to stamp on the inside of the card as well pulling the whole design together.  So inside I printed a green and coral pattern using two of the flower head stamps available in this stamp set.  I loved this so decided to carry this on, onto the front of the envelope too.  

Looking at many different card designs this week has made me realise that I do not use my designer series papers (DSP) enough in my card designs, so I am going to make a conscious effort, where possible, to use my DSP.  So on this card design I cut out two (1 1/4") stitched circles from a coral DSP and a (1") stitched circle in green for the sentiment.  

Now for the stamping, first I stamped the sentiment (Beautiful Friend) onto the (1") green stitched circle.  Then I stamped the peacock image onto the white card stock (4 1/4 x 2") using the coral and green inks.  I even added the smallest flower head in both colours in between the tail feathers.  To complete my design I added 5 small pearls to the main feather tail of the peacock.  This completed my project.

I would love to know what you think about my project, so please leave a comment.  Thank you.

Till next time, keep crafting!


Lorraine

:o)

Thursday, 8 March 2018

Pretty Floral 'Hello' Card

Pretty Floral 'Hello' Card


This A2 card base was already embossed when purchased, so I decided to use my Prismacolor Pencils to colour in the images.  I used three different shades of orange for the large flowers, two shades of red for the smaller flowers.  Then a dark blue for the tiny flowers.  All the flowers had orange in the middles.  I used two different shades of green for the stems and all the leaves.  I added some Wink of Stella to the flowers to add a bit of bling!

I used my stamp positioning tool to stamp the sentiment 'Hello' in black Memento Ink to ensure that I got a clear, dark image. I stamped this 3 times.  For the bow, I tied a piece of dark green embroidery thread  and glued it at the top left-hand corner of the card base with wet glue.

On the front of the envelope, I stamp a long border.  The long flower border filled the bottom edge of the envelope.  This completed my project. 

I would love to know what you think about my project, so please leave a comment.  Thank you.

Till next time, keep crafting!


Lorraine

:o)

Watercolour Rose

Watercolour Rose


In my craft stash I had a Blue card base (6 x 4"), so I cut a piece of White card stock a little bit smaller to go inside to write the greeting on.  I then cut a piece of gold foil card stock (3 3/4 x 4") and adhered this to the card base using wet glue.  I cut a piece of watercolour paper (3 3/4 x 3 1/2") and stamped a large floral stamp of a Rose in black Stazon Ink using my stamp positioning tool to get a good dark outline.  

I then used my ARTEZA watercolour pens to colour the image.  I added three blue sequins with wet glue at the base of the image.  When dry I adhered this to the gold layer with foam strips and then covered the whole flower with Wink of Stella to add some bling!

The sentiment "With Love" was die cut on my Big Shot with gold foil card stock.  It was too big to go straight onto the card base so I cut it into two pieces.  The extra hearts I adhered inside the card.  

This completed my project.  I would love to know what you think about my project, so please leave a comment.  Thank you.

Till next time, keep crafting!


Lorraine

:o)

Decoupage Cards (set 2)

Decoupage Cards (Set 2)


 So at Shared Craft this week Tuesday, 6.3.2018 I continued creating cards from the Create & Craft Card Kit.  This contains all that you need to create these cards apart from the Craft Essentials that a crafter needs which is: a bone folder; a craft knife; a cutting mat; scissors; scoring board and a steel ruler.  Obviously, you would need adhesive but this kit contained adhesive.  Also any type of embellishment which is additional to the card but not a necessity you may want such as ribbon, pearls, rhinestones etc.

For the first card, I added ribbon around the card stock which was placed vertically across the card base.  I also tied a bow on the sentiment tag.  No other embellishments were added.


The second card didn't really have any decoupage either.  It was just a straight card to card with a great image for a male.  I did add a further strip of the red card inside the card.


The final card I completed this week at Shared Craft was a smaller decoupage card with a vinyl record player on the front.  I thought this was a great card for any person male or female or even a teenager.  This card kit is ideal for the first-time card crafter as there are pictures to follow and there isn't many technique necessary in order to achieve a great project.  

Next week at Shared Craft I shall continue making the cards from this kit.  Look out for Set 3!


A Gold Feat

A Gold Feat


Stamping with Joy Card Challenge for Week 10 is a Sketch Challenge as shown above.  My design using this sketch is below.


In order to create my project I needed different sized scraps of Gold foil card stock.  The card base has been cut from White card stock (11 x 4 1/4") scored at (5 1/2") creating a top fold card measuring (4 1/4 x 5 3/4").  

The first layer of Gold foil is (3 1/2 x 5 1/2") this was adhered to the card base with strips of foam pads.  A piece (2 1/2 x 3 1/2") embossed in a flower embossing folder was adhered to the bottom end of the first layer.  Then I cut a piece (1 3/4 x 4") and that also was embossed using the flower embossing folder.  I glued that to a layer of White card stock before adhering it with strong sticky tape to the left-hand side of the card.  The next piece measured (1 1/4 x 3 1/2") and this was embossed with a butterfly embossing folder.  Again adhered to a white card stock layer and onto the card base but this time it was glued horizontally about 1" from the bottom of the first Gold layer.  The final Gold piece was a 2" square and this was embossed with a patterned embossing folder which also had butterflies on it.  To continue the same, it was glued to a white card stock layer and then adhered to the right-hand side of the card stock.  Because of the layers, it had a foam pad under the top right-hand corner and the rest was adhered using strong sticky tape.  

Using my Big Shot I die cut two butterflies and gently bending their wings and bodies they become more 3D.  Embellished with pearls and then adhered with foam pads to the top of the card base.  To complete my project,  I adhered a 'Thank You' Sentiment to the top with wet glue.  This completed my project.  

I would love to know what you think about my project, so please leave a comment.  Thank you.

Till next time, keep crafting!


Lorraine

:o)

Week 3

Incredible Like You (2) Second set of 4 cards created from the card kit from Stampin' Up 'Incredible Like Y...