Tuesday 23 October 2018

You Make Me Smile

You Make Me Smile

Gaynor Boyce, Administrator of "Stamp with Joy", FaceBook Group set a sketch challenge for us crafters on 13th August 2018 - Week 33.  The sketch is below: 


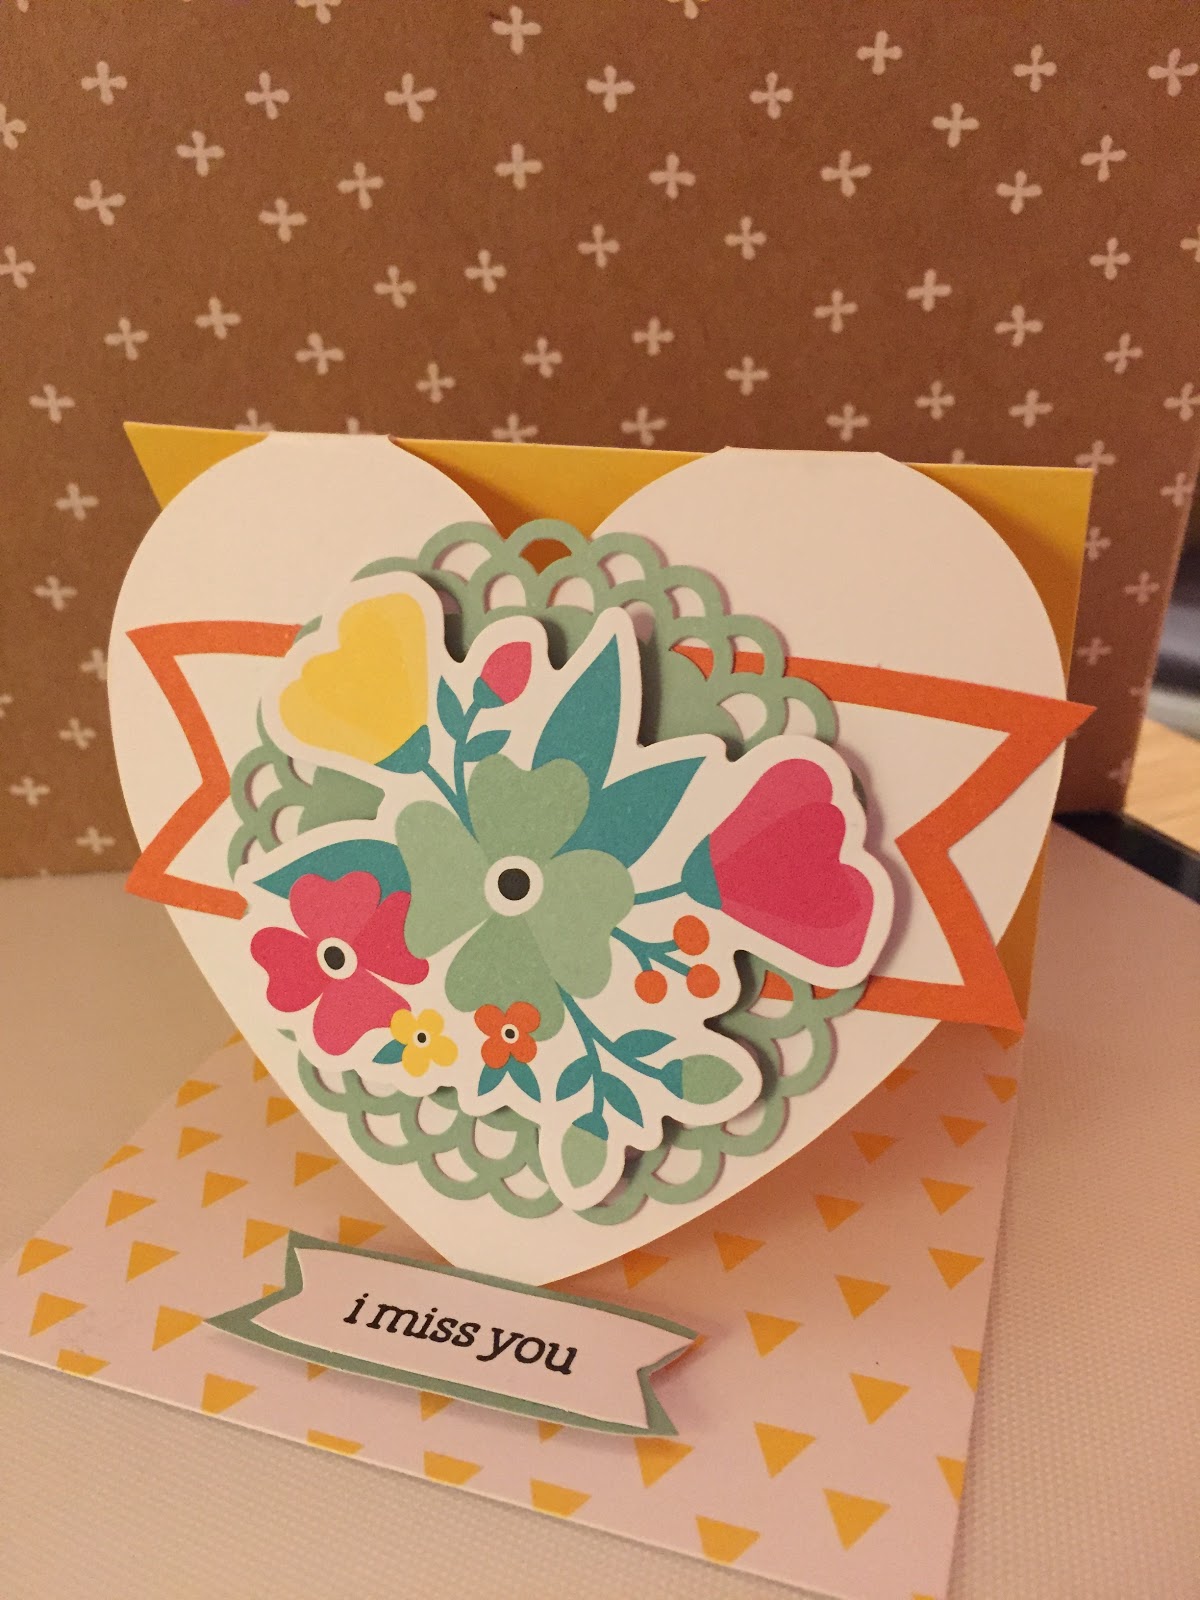
My card design using the sketch turned out like this.  I used my Stampin' Up 'Delightfully Detailed Memories & More' Cards; along with Blackberry Bliss and Grapefruit Grove card stock.  I also used the 'Wood Textures' DSP (Designer Series Paper/Patterned Paper) in between the coloured card stocks and 'Nature's Poem' DSP on the front.  The skeleton leaves in Blackberry bliss, Grapefruit Grown are adorable!  The sentiment shape was from the 'Memories & More' pack as was the sentiment.  As you can see the sentiment would not fit onto the shape because it was set out in line; so I cut up the words and arranged these onto the circular shape instead.  The flower embellishment I created using a tiny flower punch and the leaves from the 'I love it!  


This card has already been sent out to one of my friends and from her response I know she liked it.  If you like it too, please can you leave me some feedback/comments that would amazing! 

Till next time, keep crafting!

Lorraine
:O) 


Fun in the Sun


Fun in the Sun


Ann Melvin, (Administrator/Developer) of the FaceBook Group 'Positively Papercraft' set a Week 6 sketch challenge on 6th August 2018.  The sketch was as below:


My take on this sketch challenge is as below:


With it being August, I felt that it was important to create a project that projected this fact.  I absolutely love strawberries and when the tennis at Wimbeldon is on; 'strawberries' play a big part in that too.  The patterned paper I received in my craft magazine along with a page of sentiment tags.  

I paired the patterned paper with Stampin' Up 'Lovely Lipstick' and 'Blushing Bride' card stocks.  I fussy cut one of the strawberries and stalk and the two hearts were from my craft stash.  It is surprising what you can find in your stash when you put your mind to it!  

If you have enjoyed finding out about this project, please leave me some comments/feedback it is always appreciated.  

Till next time, keep crafting!

Lorraine
:O)


Follow Your Dream (Part 2)

Follow Your Dream (Part 2)

After the crafting class 'Follow Your Dream' with Anna Pickering, I had some card stock pieces left over.  Particularly, I have die cut the 6 white feathers out of the Whisper White card stock very carefully as suggested by Anna so that I could use this in a project.  I had an extra white card stock feather, I die-cut an additional 'dream' sentiment out of the middle of the Brown card stock on the previous card as it would not be seen.  I also created an extra set of the embossed feathers too.

So to create my own project from 'left-overs, additional pieces' I first cut a piece of gold foil the same size as the piece of white card stock and ran it through the Big Shot in the Rungao 'Circles' Embossing Folder.  I prepared a top-folding card base, adhered two strips of gold ribbon at the base of this and adhered the sentiment and feather directly onto the card base.  Next I off-set the white card stock with the embossed gold card stock adhered the two together and 'popped' up on foam pads.  Finally, the small embossed feathers were adhered to the bottom right-hand corner of the white card stock.


It is always useful to be frugal with your craft stash and look after the small pieces as well as the larger ones.  You never know when you might need a particular colour or size.   If you have enjoyed finding out about this project, please leave me some feedback/comments I really appreciate these.

Till next time, keep crafting!

Lorraine
:O)


Christmas Double Slider

Christmas Double Slider

This project is going to be used for two different challenges; it is always a bonus when this happens because it saves creating a further project.  

Firstly on 24th September, Sandra Riley set a challenge to all on the Stamp for All FaceBook group named the 'Fancy Fold Challenge'.  Sandra is also the administrator for Cotswold Crafter, the topic for projects set on the same date was "Surprise!" So as when you pull out the sliders two different images appear so I thought this was ideal for this challenge also.


Lawn Fawn have just bought out dies to create this 'Fun Fold' card but at this point in time I haven't got these.  I watched Sam from MixedUpCrafts on her YouTube channel and made it from following her tutorial.  

Lots of my 'Fun Fold' projects or more difficult projects I have made following a YouTube video, because it is easy to stop, start, rewind where necessary.  Or even start from the beginning again.  This particular 'Double Slider' was decorated fairly simply using peel-off stickers for the images and the sentiment was die-cut out using a large sentiment die on the Big Shot.

When making 'Fun Fold' cards or moveable projects make sure that you have provided an area for the sender to write a message to the recipient somewhere.  

Please go and spend some time watching Sam on Mixed Up Crafts as she has so many wonderful video tutorials to watch that you will be so inspired.  If you have enjoyed this blog please leave me some comments/feedback.

Till next time, keep crafting!

Lorraine
:O) 


Tufted Embossing Folder

Tufted Embossing Folder

Stamp With Joy FaceBook Group Week 41, card sketch challenge looked like this: 


My take on this sketch challenge started with the Tufted Dynamic Textured Impressions Embossing Folder; which I ran through my Big Shot on a piece of 'Blushing Bride' card stock.  I then used my alcohol markers to colour in the DSP (Designer Series Paper) that was gifted to me; but unfortunately is now retired.  This I layered on pieces of 'Blushing Bride' card stock; which was then layered on pieces of 'Whisper White' card stock.

The ribbon was from my craft stash.  The sentiment die and sentiment were both gifted to me by friends who are also crafters.  The finishing embellishment was to add small pearls to each joining section on the 'Blushing Bride' card stock that had been through the Tufted Embossing Folder.


I got quite a lot of lovely comments/feedback from other Stamp with Joy members regarding this project.  This week's sketch wasn't as hard as it first looked.

If you have enjoyed visiting my blog please leave me some feedback/comments, thank you.

Until next time, keep crafting!

Lorraine
:O)

Seasonal Layers Wreath

Seasonal Layers Wreath

On Saturday, 6th October 2018 I went with two other friends/crafters to Anna Pickering's (Stampin' Up Demonstrator) house for a crafting session to create a wreath using the Seasonal Layers Thinlits Dies.   I am also using this for the SUO Challenge which is (SUOC 210): Thanksgiving Table.  

With a ready-made grey circular structure, we then used the leaf thinlits from the pack to die cut different leaves on the Big Shot with a variety of different types of card stock.  (Whisper White card stock, Vellum and Silver Glimmer paper).

The leaves were then adhered to the structure with wet glue and small foam pads.  A 1/8" piece of Stampin' Up Fresh Fig ribbon was tied at the top to hang the wreath up from.  A Kraft oval tag with a wooden heart was threaded onto a piece of Fresh Fig Baker's Twine and tied in a bow around the ribbon.  


I love how the leaves came out, my favourite leaf die is the intricate one but the small one is great for filling in those difficult spaces.  This would also look amazing in Autumnal colours (reds, oranges, yellows etc.) or even Christmas traditional colours (reds and greens).

If you have enjoyed coming to my blog page, please leave me some feedback/comments.

Till next time, keep crafting!

Lorraine
:O)

Notes of Kindness

Notes of Kindness

I love card kits, they are a useful resource for anyone's card stash.  But they also give you so much inspiration in that you can copy the instructions as given or you can edit the designs slightly or even change the designs almost completely.  

This particular card kit is in the current Stampin' Up Catalogue 2018-2019 and it is called 'Notes of Kindness'.   Everything you need to complete 20 cards is available in the kit.  There are four different designs to create.  


Thank you for coming over to my blog, if you enjoyed this page please leave me some feedback/comments.

Till next time, keep crafting!

Lorraine
:O)


Monday 22 October 2018

Autumn is Coming!

Autumn is Coming!

So yet again I have managed to create a project that can be used for two different challenges.  These two challenges are both though from my FaceBook Group 'Stampin' For All'.  

The first challenge was a Design Team challenge and it was set by the lovely Ian Potter on 17th September 2018 with the title 'Autumn is Coming!'.

The second challenge was a Tic Tac Toe challenge set by the gorgeous Gez Carpenter.  The Tic Tac Toe grid looked like this:  

                                             Die           Stamp            Heat Emboss

                                             Ribbon     Embossing     Buttons
                                                              Folder

                                             DSP          Punch             Baker's Twine


My project took the route across the bottom line of the Tic Tac Toe grid (shown in bold).  So initially I found a brown plaid card stock base and trimmed a Kraft piece of card stock as my mat.  I used a scrap piece of DSP (Designer Series Paper/Patterned Paper) from Stampin' Up 'Wood Textures' to line a die cut double stitched rectangle in black card stock (this was gifted to me).  I used copper Baker's Twine wrapped around the Kraft card stock three times.  All these layers were adhered down on each other using my double sided tape runner.  

I then stamped one of my Santoro Gorjuss Girl stamps (the hedgehog I felt made it Autumnal).  I coloured this image in with my Derwent Pastel pencils (using as many Autumnal colours as possible).  I stamped the sentiment 'Hello' and adhered this onto the project using foam pads.  

Next I used leaves which had been punched/die cut and gifted to me by the lovely Nina Tanner; to create a very colourful base to my card.  With a couple of left over leaves, I decorated the inside of the card as well.  

I love how this project turned out, I had in mind what I wanted to do but until it started going together I wasn't 100% certain.  Thank you for coming to see my blog and if you liked this project too please leave comments/feedback.

Till next time, keep crafting!

Lorraine
:O)


Sunday 21 October 2018

Gold Monotone

Gold Monotone

I have used my created project below for the "Cotswold Crafters" card sketch challenge for the week beginning Monday 15th October set by Sandra Riley and also Ian Potter's Design Team project "Monotone Challenge" also on the 15th October for the Face Book Group "Stampin' For All".


Having a sketch challenge is often just the help you need as a crafter to get a project off the ground.  This gives you the inspiration to put something together.  I have been very, very frugal with this particular project.  The main card base is one of Stampin' Up 'Gold Foil-Edged Cards and Envelopes.'  The DSP (designer speciality paper/patterned paper) was gifted to me through a Pocket Letter swap; I trimmed 4 pieces to equal size and then trimmed 3 thinner pieces of gold foil paper to go in between.  I also trimmed a longer piece of the solid gold foil paper to go across the top.  I cut a gold foil circle using my Stampin' Up 'Star Burst' punch and die cut a circle (2") to stamp the sentiment 'Enjoy the simple things' onto.  These were adhered together and I coloured in the black hearts with my gold pen to match everything else.  The big star and 2 sticker stars were from my craft stash as was the thin piece of gold twine that I converted into a small bow to go at the top of the sentiment adhered by a glue dot. 

I would say that this is one of my favourite cards; all the elements are either scraps, recycled or have been gifted to me, the only new part of the project is the card base and envelope. 

Thank you for coming to visit my blog and if you liked my project please leave me some feedback/comments; they do help a lot. 

Till next time, keep crafting!

Lorraine
:O)


Falling Leaves

Falling Leaves

On 21st August, Ian Potter set a challenge for the members of the Stampin' For All Face Book group to create a card/project using dies, DSP (designer speciality paper/patterned paper), ribbons etc.  No stamps necessary unless you wanted to add them.  

I have created my design for the above challenge but also have had inspiration from the 'Just Add Ink' challenge (#431) which is a sketch challenge this week. 

This is my card design which is suitable for both challenges.  I have wanted to use my Stampin' Up 'Falling Leaves' stamp/die set but as yet hadn't got around to it.  I used scraps of Stampin' Up 'Wood Textures' DSP and some copper scrap to die cut the die with my Big Shot.  The other two leaves are material and were gifted to me recently by a fellow crafter (Nina Tanner) in a Pocket Letter swap.    I did stamp a sentiment from the 'Falling Leaves' set in Merry Merlot ink and I stamped a set of three leaves in Mossy Meadow ink inside the card and on the envelope in order to extend the theme of these project throughout.  

Here is my project:


It is a very clean and simple design but I absolutely love it.  I love how the material leaves make the copper die cut leaf 'pop' on the page.  I am a very frugal crafter and anywhere I can save or use up scraps of my stash I will.  The 'Wood Textures' DSP is so versatile, it can be used in many different ways on different projects.

Thank you for visiting my blog, if you like my project please leave me some comment/feedback and I look forward to seeing that you have visited again.

Till next time, keep crafting!

Lorraine
:O) 

Wishing You Well

Wishing You Well

Ian Potter set a Design Team challenge for us on Stampin' For All Face Book group - to design a card from one of the current Stampin' Up Catalogues.  

I am also going to use this same design for the SUO challenge (#SUOC209) this week which is to design a card from the Stampin' Up Holiday Catalogue.  

This is my design for both these challenges, I used Stampin' Up 'Wishing You Well' stamp set for the image and the sentiment.  I used one of the large cards from the Stampin' Up 'Delightfully Detailed Memories & More' Pack which had some Blackberry Bliss colour on it.  I then backed the stamped image on Blackberry Bliss and Mossy Meadow card stock.  

The image is stamped in Mossy Meadow and Blackberry Bliss ink.  I absolutely love how the 'ribbon' stamp stamps out.  


This stamp set image is so delicate, I can see me using it in many other projects in the future.  Thank you for coming to my blog and if you liked this projects please leave me some feedback/comments.

Till next time, keep crafting!

Lorraine
:O) 


Thursday 18 October 2018

Crochet Toys

Crochet Toys

My crafty pal, Mandy asked me to crochet these kits that she had purchased.  The reindeer, the unicorn, the lion and the giraffe.

I taught myself to crochet when I was first diagnosed as having terminal secondary breast cancer; my hubby bought me some crochet kits to keep me busy whilst I was bed bound.  Now, I am able to follow a crochet pattern, only referencing certain stitches or abbreviations on YouTube when necessary.  


Happy Birthday, Happy Birthday!

Happy Birthday, Happy Birthday!

On Wednesday 8th August, Karen McClure set this sketch challenge for those of us on 'Stampin' For All' FaceBook site. 


This is my take on this sketch.  I firstly, embossed the card base front with a 'Happy Birthday' embossing folder and then a curved edgelit die on the bottom edge.  I added some birthday patterned paper on the inside of the card base that would then be seen through the acetate that I attached to the front panel.  The candles were cut from scraps of glitter paper, the candle flames were die cut from a leaf die I had in my stash.  

On the envelope I stamped an image from a retired Stampin' Up stamp set called 'Celebration Time".


Oh Happy Day

Oh Happy Day

I purchased 'Oh Happy Day' Card Kit from Stampin' Up because I was in need of some birthday cards very quickly because I had cleared my card stash during the month of September.  The cards were used for my individual hand-made card challenge; sent out to friends and family members.  On this challenge I also send out #RAK (Random Act of Kindness) cards, cards to say 'Hi' and also to say 'Thank You'.  So I need quite a lot of cards every month.

This card set appealed to me because it had different sized card bases available and lots and lots of additional elements to add to the designs.  I kept to the instructions generally but I did make some changes to the designs.  The main change was the sentiments, I used the stamps provided but I used my own sentiment stamps too.  

This card kit makes 20 cards with envelopes, there is an black ink spot, a stamp block, a selection of sentiment stamps and even dimensionals to adhere the elements to the card bases.  I loved putting these cards together so much I ordered myself another kit.  The cards on the right-hand side are from the second kit I purchased.  Again, I made some changes to the card layout, sentiment and use of some embellishments.  It was fun to see how the cards could be changed slightly and look so different.  (there are still some of the second card kit to complete, so watch this space!) 


If you have enjoyed my blog, please leave me some feedback/comments as these are useful to me in my crafting development.

Till next time, keep crafting!

Lorraine
:O)

Week 3

Incredible Like You (2) Second set of 4 cards created from the card kit from Stampin' Up 'Incredible Like Y...