Tuesday 26 June 2018

"Quack" translated means "Happy Birthday"

"Quack" translated means "Happy Birthday"


My take on this sketch is photographed as below:


To recreate this card first I trimmed a piece of vanilla card stock into a card base of (5 3/4 x 4 1/8").  I got a piece of blue card stock and trimmed this to (5 5/8 x 4").  With a scallop die (1 3/4") cut this out of the blue card stock where the patterned paper is going to go so that you cannot see the hole.  Next I cut a piece of patterned paper to (5 x 1 3/4") and adhered this diagonally across the blue piece of card stock securing at the back with snail adhesive.  This blue card stock piece was then adhered straight   onto the vanilla card stock front with double sided tape. 

Next I trimmed a piece of white card stock to (4 x 3 1/4") and  sponge the edges with Memento Dewdrop Summer Sky ink.   Cut another piece of white card stock (5 x 2 1/2") and again sponge the edges with the Summer Sky ink.  Then with the same colour ink sponge the rain drop stencil and then repeat with Gray Flannel ink as well.  Next with Black Memento ink stamp the reeds and grasses at the top of this piece of white card stock.  With a scrap of white card stock die cut the puddle twice, glue these together and then sponge it with the Summer Sky ink completely.  Stamp the duck image onto a piece of scrap white card stock and colour with Spectrum Noir Alcohol Marker Pens.  Then fussy cut the duck out.  

Cut a (1 1/4") circle out of white card stock and stamp in black Memento ink the sentiment "QUACK! Translation Happy Birthday" inside the circle.   Adhere the white circle straight onto the blue scalloped circle with double sided tape.  Now to assemble the rest of the card.

Adhere the first white rectangle of card stock on top of the pattern paper and then the other rectangle piece of white card stock which has the images on it; on top of that.  At the bottom of this piece of card stock adhere the die cut puddle with wet glue.  Put the duck onto square foam pads and adhere just above the puddle.  Put the blue scalloped circle on a dimensional and adhere just below the reeds.  Finally add a flower sticker onto the sentiment circle to complete the sketch challenge for Week 23.

On the front of the envelope, I stamped the sentiment "Happy Mail" and the image of the duckling delivering the mail; this lets the recipient of this card know it is not a bill!  I also stamped the image of the duck looking rather dapper!  

If you have enjoyed this blog post, please let me know by leaving me some feedback, thank you.

Till next time, keep crafting!

Lorraine
:O)


Birthday Sketch Challenge

Birthday Sketch Challenge

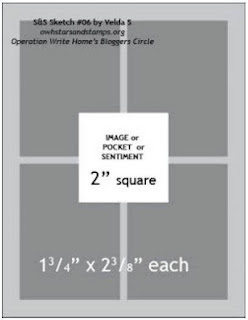
Ian Potter from Stampin' FOR ALL Facebook group set the Wednesday 13th June 2018 Sketch Challenge as a Birthday Sketch Challenge (as it was his birthday).  The sketch was as follows:


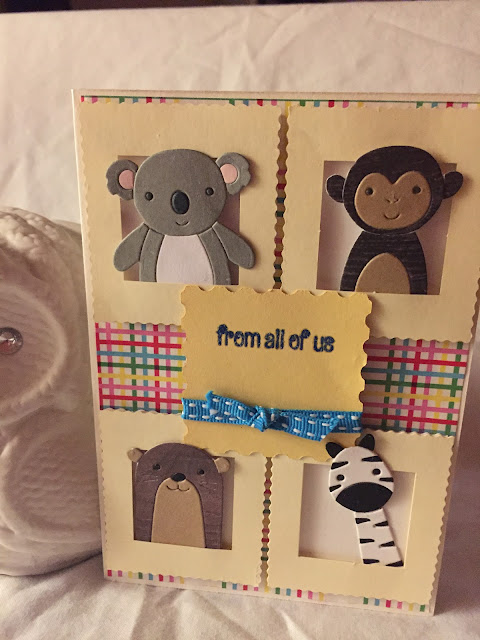
My entry for the challenge is photographed below:


To recreate my card initially you will need four animal characters.  These are Simon Says Stamp Picture Book Characters (the Koala, the large Monkey, the Otter and the Zebra).  They are die cut out of card stock scraps and adhered to a piece of thin paper with wet glue.  

The Vanilla card base measured (5 3/4 x 4 1/8") and the patterned paper was (5 5/8 x 4") and it was glued straight to the card base front using double sided tape.  Then cut 4 pieces of cream card stock measuring (2 3/8 x 1 3/4").  The cream die cut frames I had already in my craft stash but they after the cream card stock was adhered to the patterned paper the frames were adhered to the card stock using square foam pads.  The Picture Book Animals were adhered inside the frames using square foam pads as well.  

Finally the (2 x 2") die cut yellow card stock was also from my craft stash.  I used an embossing buddy on this before stamping the sentiment "from all of us" in blue pigment ink and covering this with sparkling clear embossing powder.  This was heat set and then a blue ribbon was tied in a knot around the bottom part of the die cut shape.  The shape was adhered to the centre of the card using square foam adhesive pieces.  

This completed the card project, but I then stamped the sentiment "Happy Mail" onto the front of the envelope along with the image of the duckling delivering the mail so that the recipient of this card would know it was not a bill!

Thank you for coming to see this blog page, if you have enjoyed the project please let me know through giving me some feedback on this blog thank you.

Till next time, keep crafting!

Lorraine
:O)


Framed House Decor

Framed House Decor

Gez set the Design Team Project for 18-22 June 2018 - Home decor frame.  She created a frame herself and put a video tutorial of this on her YouTube Channel.  The album of the other created items can be found on the Stampin' FOR ALL group Facebook page.

This is Gez's example of her Framed House Decor:


This is my submission for the Framed House Decor Design Team Project:


To create mine, I had a frame in my craft stash already, so using the Build an Apron stamp set and dies I cut out a black apron, a black pocket, neck ribbon and apron ties.  I die cut a silver pair of scissors and a cream knife (to represent a bone folder).  The Stampin' Up! label came from a page of the grid paper.  These pieces were all glued together with wet glue first. 

Then I cut a piece of cream card stock to fit the back of the frame and I stamped randomly in Black Memento ink, "I 💜 stamping" all over this piece of card stock.  On another piece of cream card stock I stamped the sentiment "Made with Love" in black Memento ink which is also from the Apron Builder stamp set.  I backed this with a piece of red card stock and adhered it diagonally to the top left-hand corner of the frame.  

I used the stems and flower images from Apron Builder and stamped these across the bottom of the frame in green for the stems and yellow for the flowers.  

This completed my 'Framed House Decor'; I love it and it presently is sitting on my windowsill because I am not sure whether to keep it or gift it!  

Thank you for coming to visit my blog page, if you liked this blog please leave me some feedback, thank you.

Till next time, keep crafting!

Lorraine
:O)


Tall & Skinny

Tall & Skinny


As it is titled it was 'Tall & Skinny'.  So this was my entry for Week 25 Stamping for Joy's Sketch Challenge: 


So to recreate my 'Tall & Skinny' card you will first need to cut a dark grey piece of card stock into a card base measuring (8 x 4 1/8").  Then cut a piece of cream card stock (7 3/4 x 4") and adhere this inside the card base to write the greeting on.  With the excess pieces of cream card stock, trim another piece to (7 3/4 x 1 3/4") and three smaller pieces to (2 x 2").  On the smaller squares I stamped three different Santoro Gorjuss girl design.  These were then coloured using Spectrum Noir Alcohol Marker pens.  The die cut frames were gifted to me by a lovely crafty friend called Nina; so it was lovely to be able to use them in this card project.  I adhered the frames onto the cream card stock with double sided tape.

In my craft stash I had some silver adhesive stickers and I took the stripes of flowers and bordered the cream piece of card stock putting a vertical sticker sentiment 'HAPPY BIRTHDAY' down the centre.  I added one of the flower stickers to each of the frames too.  Before adhering the cream strip of card stock I tied a piece of lilac ribbon into a knot at the top and I also tied a piece of blue ribbon into a knot at the bottom.  This piece of cream card stock was adhered to the card base front using double sided tape.

Then I put square foam pads at the back of each of the coloured frames, putting the lilac frame at the top, the peach in the middle and the blue at the bottom.   To complete this project, I stamped the sentiment 'Happy Mail' on the front of the envelope and the image of the duckling delivering the mail so that the recipient of this card would know that it was not a bill!

If you have enjoyed this blog post, please leave me some feedback thank you.

Till next time, keep crafting!

Lorraine
:O) 
RAKs

RAKs (Random Acts of Kindness)

So I have received a few RAKs over the past few months and I thought I would put them all on together.  Here are the beautiful cards I have been sent as Random Acts of Kindness from card crafters I do not know up until receiving their fabulous cards which I display on my bedroom windowsill as long as I can until there is no more room for any more.


This one is from the lovely Sue Wright in Tennessee United States. 


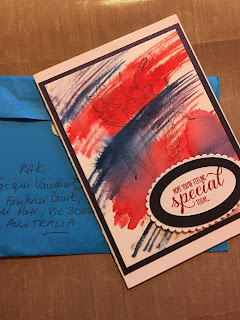
This special card came all the way from Australia from Jacqui Vaughan.


Kylie and Bruno Bertucci from Australia sent me this gorgeous Hand Delivered Get Well Soon Card. 


The caring Sally Byrne from Canada sent me this fabulous Comfort Box with all sorts of things for me to eat, drink and wear.


Ellie Pecker Svihus from the United States sent me this beautiful Sweet Sugarplum Card. 


This lovely coffee lovers card is from Pat MacDonald in Canada.


Shannon Aydukovic sent me this card from the United States which is so caring as it was not her first RAK to me.  Thank you Shannon.

These two came from a very special crafty friend called Martha Ellis who also gifted me stamps as well.  She is such a generous lady.  


Last but not least this fabulous easel card came from Jessie Burton in Australia.


Thank you to each and everyone of you who have sent me a fabulous card, I will endeavour to return the favour as soon as I can.


Beautiful Banners

Beautiful Banners


My take and entry for this week's sketch challenge is as photographed below:


So to recreate my take on this week's sketch challenge firstly you would need to make a Vanilla card stock card base (5 3/4 x  4 1/8").  Then cut a piece of purple card stock (5 5/8 x 4"), on this stamp a small flower image with a tone-on-tone ink (I used Memento Dewdrop Grape Jelly and a flower stamp that was in my craft stash). Whilst I had the stamp and ink out I stamped a line of the flower on the bottom of the envelope and also a line of them up the right-hand side inside the card.  I found a suitable shaped die cut for the sentiment to be stamped on.  I stamped the sentiment in the Grape Jelly "Happy BIRTHDAY" and also a number of the flower image around the edge of the die cut shape. 
 Next I found three different patterned papers which would go together on the card.  All of those I chose had some yellow in them so I decided to back these onto yellow card stock.  

So I cut the yellow card stock to (1 5/8") and the pattern paper to (1 1/2") wide.  (The lengths do not matter at present). I then put all the yellow card stock together and cut a pennant end creating the banner.  I repeated this process with the patterned paper but ensuring that the pennant mid-point was just a tiny bit higher than the yellow card stock one; so that then the patterned paper would sit neatly on top of the yellow card stock both with pennant ends creating three banners.  The pattern paper was adhered onto the yellow card stock using double sided tape.  The banners were then adhered to the purple card stock with foam pads and then the excess at the top removed with scissors.

A piece of dark purple ribbon about (9") long was put along the top quarter of the card front, I tied the bow first before adhering the ends with double sided tape at the back of the purple card stock.  To keep the bow from unravelling I put strong glue dots underneath the knot and the ends of the bow.  This was then adhered to the card front using double sided tape.  

The sentiment was adhered over the ribbon using square foam pads and the final embellishment to the card was to add some pearls to the centre of the whole flowers on the sentiment die cut shape and 5 of the flowers on the purple card stock.  On the envelope, I also stamped the sentiment "Happy Mail" and the image of the duckling delivering the mail in order that the recipient of this card knows that it is not a bill!

If you have enjoyed this blog of this card project, please let me know by leaving me some kind feedback.  Thank you.

Until next time, keep crafting!

Lorraine
:O)

All The Reds

All The Reds

Stampin' FOR ALL had a Wednesday Colour Challenge - hosted by Helzie which was 'All The Reds'.  My card was inspired by the card created by Kelly Acheson on her YouTube Channel 'Fun Fold - Healing Hugs'.  So Thank you Kelly because I was able to make a great 'Fun Fold' Card using red card stock and ink.  My card project is photographed below:


To create my project you will need a piece of red card stock (9 3/4 x 4 1/4") scored at (5 1/2") and another piece of red card stock (9 1/2 x 1 1/4") also scored at (5 1/2").  Once these are trimmed, scored and burnished then you can go onto to the stamping part.

For this part you will need a piece of black card stock (4 x 4") and a piece of white card stock (3 7/8 x 3 7/8").  On the piece of white card stock stamp in red ink a chosen floral image, so that it covers the whole of the piece in different directions and off the edge too.  Then on a piece of scrap of white card stock, stamp the sentiment of your choice and the same floral stamp.   Next punch/die cut out with a 2" circle.  Stamp inside the card with the floral image and also on the envelope too.   

Then punch/die-cut a large black circle from the centre of the (4 x 4") piece of card stock.   Adhere the white card stock to the black card stock and the black card stock to the front panel of the red card base.   Add wet glue to the back of the long arm piece of red card stock, press down onto the back once you have got it straight and central on the front.  Next add more wet glue to the end of the red handle card stock and adhere the black circle.  The white circle can then be adhered to the black card stock one.  Finally, tie a red bow and adhere this onto the red card stock arm too.

To finish off the project, stamp the sentiment 'Happy Mail' onto the front of the envelope and the image of the duckling delivering the mail.  

If you have enjoyed this project please leave me some feedback on my blog, I would really appreciate this.  

Till next time, keep crafting!

Lorraine
:O)


Basket Weave

Basket Weave

The Global Design Project #143 this week is a Theme Challenge.  The theme was inspired by the New Stampin' Up 2018-19 Catalogue and just like the catalogue; it has endless possibilities.  The Team would love to see crafters share what makes us live for stamping and creativity! This could be by using a favourite stamp set, a particular colour combination or even the stamping tool - anything that celebrates why you love crafting. 

So I thought what would represent my love of crafting the best, stamps, dies etc.  I was then drawn to the embossing folders in the catalogue.  They create such a wonderful patterned backdrop behind certain which helps too.  When I looked, there were 7 new folders in the new catalogue.  I have ordered all of these and can't wait for these to arrive so that I can create cards with them e.g. The Tufted, The Striped Scallops or the Subtle.  But until then I will have to make do with those I have already got.  So I created my design using the Basket Weave that was so popular during Sale-A-Bration that it was brought back into the new 2018-19 Catalogue as well.

Below is my card design. 


So to create my card design, I initially created an A2 Vanilla Card Base and then another piece of Vanilla card stock (5 3/4 x 4") which was run through the Big Shot with the edgelit scalloped end which cut this about (1 3/4") from the bottom.  This was then run through the Big Shot in the embossing folder (Basket Weave).  

I adhered a piece of patterned paper onto the card base and then the cut piece of embossed card stock on top of this.  But just prior to that I had adhered a piece of blue ribbon around the edge of the embossed card stock.  Using a smaller piece of the same ribbon, I created a knot on the front.  

The next part was to stamp the images, I stamped in black Memento ink the basket of flowers, the tag and the butterfly from Blooming Basket.  I coloured these in with my Spectrum Noir alcohol makers (TN1, TN2, TN6, BGR1, JG4, JG1, JG3, CG3, CG2, PP2, PP1, IB3 and IB1).  I then coloured some rhinestones green to put onto the small black images.  I coloured around all the images with the (BRG1) which is very light grey so that when I fussy cut these the white would not show.  I put small dimensions onto all the back of all the images and placed these on top of the embossed piece of Vanilla embossed card stock.  I added (x2) rhinestones to the butterfly too.  

On the envelope I stamped the sentiment "Happy Mail" and the duck delivering the mail.  This completed my project.  If you have enjoyed this project, please let me know by leaving me some feedback in the comments, thank you so much.

Till next time, keep crafting

Lorraine
:O)

Thursday 7 June 2018

Double Triangle Fun Fold

Double Triangle Fun Fold

Helzie Slimm set a 'Fancy Fold' Challenge on the 28th May 2018 for the members of Stampin' FOR ALL.  My two submissions for this challenge are photographed below:

I got the idea for my Fancy Fold from the lovely Kelly Acheson 'A Stamp Above' Stampin' Up demonstrator; who put a video tutorial on her YouTube channel on 1st June 2018 called "Double Triangle with Abstract Impressions".   I CASEd her design for the Fun Fold but I did not use the stamp set Abstract Impressions, the same patterned paper or sentiments.

I was able to use this card for another card challenge from Stampin' FOR ALL Facebook group set by Ian Potter.  It was a card sketch challenge and looked like this:


Weird that I could use my card in a different challenge without changing it a bit.  But that is great because it shows what a great 'Fun Fold' Kelly demonstrated in the first place on her YouTube channel. 


To make these cards you will need a piece of A4 card stock which needs to be cut to (11 x 8 1/4").  A piece of patterned paper (5 1/4 x 4") and scalloped punched circles in silver foil card stock (2 1/2"); (2") and (1 1/2").  In vanilla card stock scalloped punched circles (1 1/2") and stitched circles (1 7/8") and (1 3/8").  Also some (1/4") ribbon of the colour of your choice. 

So firstly cut the A4 card stock to size, then if it will fit in your trimmer then cut at a diagonal.  If not draw a faint line and cut with a craft knife diagonally leaving you with (x2) large triangles.  Next fold the top corner down to the bottom right-hand corner and burnish the fold.  Then fold the left-hand corner in to meet up with the opposite side and burnish the fold.  Next with the patterned paper, put this in the trimmer and cut diagonally and this will give you (x2) triangles to use on both cards.  This is adhered to the bottom triangle with snail adhesive.  (On one of my cards I was slightly out with the patterned paper so I added some silver washi tape along the edge so that my error was covered up.)  

Next for the stamping, on the vanilla circles stamp the sentiment/s; I chose "Sending Love and Hugs to you" and "Just for You..." On the other vanilla circles stamp an image, on these I chose a rose image to match the roses on the patterned paper.  The stamping was done with Memento Dewdrop Toffee Crunch.  The images were all adhered with snail adhesive onto the silver foil card stock scalloped circles and popped up on foam pads before adhering to the top right-hand corner of the card base.  The sentiment circles were slightly different, the back of these were covered with double sided tape; then a piece of (1/4") green ribbon was folded forwards and backwards and then forwards again.  Then another set of double sided tape was applied on top of the ribbon and then the silver foil card stock scalloped circles were adhered to secure the ribbon between the two pieces of card stock too.  The foam pads were placed on the left-hand side diagonal of the sentiment and placed at the edge of the bottom triangle.  This meant that the sentiment was adhered to the triangle with the patterned paper but not the plain one; but when the card was laid flat the sentiment kept the card closed.  

Finally, I stamped the sentiment "Happy Mail" onto the front of the envelopes along with the image of the duckling delivering the mail so that the recipients of these cards knows that it is not a bill!

Thank you Kelly for demonstrating to me how to create these fabulous 'Fun Folds'; which also meant that I had a fabulous entry to submit to Helzie's 'Fancy Fold Challenge'.  Thank you for coming to visit my blog page and to this particular page.  I would value your feedback a lot, thank you.

Till next time, keep crafting!

Lorraine
:O)


Follow That Sketch!

Follow That Sketch!


My take on this sketch is this:


To create this, I first cut a Vanilla card base (5 3/4 x 4 1/8") and an extra Vanilla layer (5 5/8 x 4").  I cut a piece of patterned paper (5 4/8 x 3 7/8") and then cut this diagonally. (Only one piece necessary for this design.)  With a long piece of gold foil card stock I punched a decorative edge which measured (7").  I embossed with die of a decorative shoe in gold foil card stock.  I found (x2) Kraft & Gold coloured tags in my craft stash and added  (1/8") ribbon to the end of these.  I also used this gold ribbon around the card middle too.  I punched a gold foil sunburst circle (2") and a (1 1/2") white circle on which I stamped the sentiment "ENJOY THE Simple THINGS".  I stamped (x3) red hearts under the sentiment and added a Pink pearl as embellishment.

Now I could put this card together.  First I adhered the patterned paper to the gold foil punched edging and this was then adhered to the bottom left-hand half of the vanilla layer (but only on the edges without the gold foil).  Next the gold ribbon was secured at the back of the vanilla layer and a bow was tied at the left-hand vertical edge.  The layer was adhered to the card base using foam pads to give the card some dimension.  Now the embossed gold shoe was adhered to the patterned paper, so was the sentiment (but only on the edge touching the patterned paper).  The two tags were slipped inside the pocket formed by the triangle of pattern paper.  These were secured with a bit of double sided tape so that they did not fall out.

On the envelope I stamped the sentiment "Happy Mail" and the duckling delivering the mail so that the recipient of this card knows that it is not a bill!

I love taking part in the sketch challenges, I hope that you have enjoyed finding out how I created this particular take on Week 23's sketch.  If you did, please leave me some feedback I would really appreciate this, thank you.

Till next time, keep crafting!

Lorraine
:O)


If You Go Down in the Woods Today ...

If You Go Down in the Woods Today ...

Ian Potter's Monday's DT Challenge for Stampin' FOR ALL (June 4th 2018) was to 'Emboss with a die'.  My card for submission is photographed below:


I cut a card base in brown card stock (6 1/8 x 4 1/4") and another brown card stock layer (5 7/8 x 4 1/8") using my stitched rectangle die.  This layer was put through the Big Shot using the die embossing sandwich which uses the precision base plate and the silicone mat.  So any die can be used to emboss.  I used my Birch Tree die to emboss the image onto the layer.  This was then adhered to the card base using foam pads.  Then I transferred the Big Shot back to the magnetic plate to die cut the different parts of the bears.  Brown for their bodies and heads; White for their muzzle and bellies and Black for their noses and eyes.   Then all the pieces are adhered together using wet glue.  I put two down the bottom of the trees, one climbing a tree, one inside the card and the last one on the envelope to continue the theme throughout.  Inside the card, I glued a piece of white card stock (4 1/2 x 2 3/4") for the greeting to be written on.  On a scrap piece of Black card stock (4 x 3/4") I used my embossing buddy before stamping with Versamark the sentiment "For a BEARY SPECIAL Friend" (which comes from MFT 'Beary Special Birthday') and heat embossing this with white embossing powder.  A pennant was then cut in the left-hand side of the card stock strip.  This was put on foam pads and adhered to the top of the card.  

The only thing left to do was to stamp the sentiment "Happy Mail" onto the front of the envelope and the duckling delivering the mail which helps the recipient of this card know that they are not receiving a bill.

Thank you for coming to my blog page and spending time looking at my blog entry.  I do appreciate that, I would be grateful for any feedback you would like to give me, thank you.

Till next time, keep crafting.

Lorraine
:O)

Wednesday 6 June 2018

Layered Floral Vellum

Layered Floral Vellum


Annemarie at IN(K)SPIRE_me chose a sketch challenge this week #353 .  The sketch is below.  


My  take on this sketch is photographed below too.


To create my card, I first cut a Light Blue card stock base (5 7/8 x 5 7/8") and another Light Blue card stock layer just slightly smaller (5 6/8 x 5 6/8").  Whilst the trimmer was out I got all the cutting of the card stock completed; so  I next cut a piece of White card stock (5 7/8 x 5 7/8"), a Black piece of card stock (4 7/8 x 3 3/8") and a piece of Red foil card stock (4 6/8 x 3 2/8").  The final piece to cut was the patterned vellum, which was cut to (4 5/8 x 3 1/8").  I cut a piece of Blue stitched ribbon (8") and made a bow out of another piece.  

Next I used my Spectrum Noir Alcohol pens to give the patterned vellum some colour (DR2, DR4, JG2, JG3, TN9, OR2, PL5, LV3 and BT8).  

Now to put my card together, I adhered the light blue, the white, the black and the red foil card stocks with wet glue straight onto each other.  I then stuck some tape on the back of the white card stock to hold the blue stitched ribbon and also used some double sided tape to adhere the bow onto this.  

I had some gold border stickers so I put these around the outside of the vellum piece.  I added some gems so that I had places to put adhesive and a sticker 'Happy Birthday' gold sentiment to match in the gold border.  

Inside the card I put a strip of the red foil card stock and the coloured flower vellum down the right-hand side and also a 'Happy Birthday' sentiment which was vertical too.  

On the envelope I stamped the sentiment 'Happy Mail' and the image of the duckling delivering the mail so that the recipient of this card would know it was not a bill!

Thank you for coming to my blog page, I appreciate all feed back.

Till next time, keep crafting!

Lorraine
:O)


Tuesday 5 June 2018

All My Hearts

All My Hearts

Just Add Ink's  #411 card challenge is a sketch challenge this week.
  

My entry for this challenge is photographed below:


To create my entry, I first took a piece of card that had different pastel colours on it and cut into a card base (5 1/2 x 4 1/8").  On my Big Shot I cut a large stitched rectangle (5 1/8 x 3 1/2") using my MFT stitched rectangle dies.  I also die cut a number of different sized hearts (some plain, some decorative).  From my craft stash I found a pink card stock envelope and a suitable tag sentiment which says "HAPPY BIRTHDAY TO YOU".  

Next I put my card together.  I adhered the stitched frame using foam squares (which gave the frame some dimension).  I then adhered the pink envelope onto the bottom right-hand corner of the frame using double sided tape.  The other hearts were layered across the card front right up to the top left-hand corner.  These were adhered using wet glue and some foam squares to stop them collapsing.  

The sentiment was a tag so I threaded some pink and white Baker's Twine through this and secured it under the large floral heart with some double sided tape.  I adhered the tag the same way onto the corner of the stitched frame.  

This was quite a quick card to put together once I had decided what to do and the die cutting was complete.  On the envelope I stamped the sentiment "Happy Mail" and the duckling delivering the mail; this helps the recipient of this card know it is not a bill!  

Thank you for taking the time to look at my blog post; I would appreciate any feedback.

Till next time, keep crafting!

Lorraine
:O)

Gold Shaker!

Gold Shaker!

Color Throwdown Challenge #495 was a colour challenge this week to use the colours Navy, Gold and Burgundy.


My entry to this challenge is photographed below:


So to create my card I first cut a Navy card base (5 3/4 x 4 1/8").  I die cut (x2) large stars; (x2) medium stars and (x2) small stars into a piece of thick Gold card stock to create spaces for the shakers.  I filled in the edges with the spare pieces of gold card stock.  Acetate was adhered onto the back of the gold card stock with double sided tape to create the shaker windows.  Foam tape was adhered in pieces all around the edges of the stars and all around the rest of the gold card stock so that it did not sink.  

Inside each star I put gold beads, gold stars and purple sequins.  The tape backing was removed and another pieces of Navy cards stock (5 3/4 x 1/8") was adhered on the back.  

Then I die cut a shape for the sentiment in Burgundy card stock and stamped 'JUST TO SAY ...' on this in black Memento ink.  I die cut the same shape in gold foil card stock and cut this one in half to create a mat for the sentiment.  They were adhered together using wet glue and then adhered to the front of the card with a foam pad.  

Inside the card I adhered a white card stock rectangle (4 3/8 x 2 3/4") and stamped the sentiment "Happy Birthday" and also a small gold star to carry on the theme from the front of the card.

On the envelope I adhered another gold star in the bottom left-hand corner; again to carry on the theme.  I also stamped the sentiment "Happy Mail" in the top left-hand corner along with the image of the duckling carrying the envelope.  This is to let the recipient of this card know that they are not getting a bill!

This completed my project.  If you have liked my project please let me know by giving me some feedback thank you.

Till next time, keep crafting.

Lorraine
:O)


Celebrate Birthday

Celebrate Birthday

CAS-ual Fridays Challenge  #CFC200 8th Birthday Celebration!  This week's challenge is a birthday one because CAS-ual Fridays are turning 8!  What a great way to celebrate in getting us crafters to create birthday cards for a special occasion.  


My submission for this challenge is photographed below:


So in creating my entry I cut a white card base (5 3/4 x 4 1/8") and a white card stock layer (5 1/2 x 3 7/8").  Then on my Big Shot I cut out (1") numerals in white card stock and the word 'Celebrate' too.  These were cut out more than once to ensure that there was enough to fill the card front and the 'Celebrate' words were going to be adhered together to make them more pronounced on the card.  As was the numeral '8'.  I cut (x1) '8' and (x1) 'Celebrate' in gold foil card stock too. 

The white card stock layer was adhered straight to the card base with double sided tape.  The numerals were adhered randomly to the white card stock layer with wet glue.  The numeral '8' pieces were adhered one on top of the other; with the gold foil layer on the top.  As was the word 'Celebrate'.  The numeral '8' was adhered in the bottom right-hand corner and the word 'Celebrate' was adhered over the top of the other numerals on a diagonal.

Next came the envelope, I stamped the sentiment 'Happy Mail' on the front as well as the image of the duckling delivering the mail.  This helps the recipient of my cards know that they are not receiving a bill! 

This completed the project.  If you have liked my project, please let me know by giving me some feedback thank you.

Till next time, keep crafting!

Lorraine
:O)


Saturday 2 June 2018

Diesel Train

Diesel Train

A friend asked me to make her a card with a Diesel Train on it for her son as he drives this type of train.  I did not have a Diesel Train image in my craft stash; so I went on Google images and found a suitable image and printed this off twice.  My completed project is photographed below:


So the create my project I first found a Brown Plaid piece of card stock (5 3/4 x 4 1/8"), I then cut a piece of White card stock (5 3/4 x 3 1/2").  I cut one of the images to the same size of the White card stock and adhered it with snail adhesive.  

Next I used my Prismacolor coloured pencils to colour in both images, I used my Zest blender to blend out the pencil lines and then fussy cut the Diesel train image and the most image of the trees and rock in the foreground.  These were adhered on top of the images underneath with foam pads to give the card a 3D feel and dimension.  To all the windows and lights on the Diesel train I added Glossy Accents.  

Then I found a piece of Black card stock in my scraps folder and cut this to (2 6/8 x  1 1/4").  Using my embossing buddy well because of it being black card stock, I then stamped the sentiment "Happy Birthday" (from a sentiment stamp set gifted to me by Martha Ellis my crafty pal) with Versamark and heat embossed it with Gold embossing powder.  This I adhered to the top right-hand corner of the card front with snail adhesive.  

I left both the inside of the card and the envelope blank as my friend had not requested anything to be stamped or put on these parts of the project.  Normally, I would continue the theme of my project into the centre of the card and onto the envelope.  

Thank you for coming to look at my blog page and this particular project.  I would appreciate any feedback please.  

Till next time, keep crafting!

Lorraine
:O)


Punch Galore with the Cookie Cutter Punch!

Punch Galore with the Cookie Cutter Punch!

Ian Potter from Stampin FOR ALL #stampinforall FaceBook group set the Wednesday Challenge for the craft members on May 23rd; to 'Use Punches Differently'.  

At present I do not have many punches in my craft stash so I wasn't quite sure how I was going to get on in this challenge.  I punched out the shape from each of the punches I do have to see what I could possibly do with them.  I ended up deciding to use the Stampin' Up "Cookie Cutter Builder" punch for my design.  


So I cut a pink card base (5 3/4 x 4 1/8") and a dark blue card stock layer (5 5/8 x 3 3/4").  I then used the punch to punch out (x8) Rose Pink card stock Cookie cutter shapes and (x6) Rose patterned card stock Cookie cutter shapes.  I did not have the Stampin' Up "Thanks" stamp so I fussy cut out the image from the Stampin' Up Catalogue 2017 and coloured it in with my Spectrum Noir Alcohol pens. 

Next stage was to put the card together.  I put the rose patterned punched shapes with the legs facing upwards and downwards at the top and bottom of the Blue card stock.  The rose pink punched shapes I slotted them together and this made a complete section that I adhered on top of the rose patterned pattern punched shapes.  Then I used wet glue to adhere the "Thanks" sentiment and rose image on top of the rose pink punched shapes.  I tied a small pink bow and adhered this at the base of the card front.  The blue card stock was adhered to the pink card base with foam pads to give the card some dimension.  To embellish my card I adhered (x5) Rose sequins and (x5) Black rhinestones on top of these selectively around the front of my card. 

On my envelope I stamped the sentiment "Happy Mail" and the image of the duckling delivering the mail so that the recipient of my card will  know that it is not a bill! 

Thank you for looking at my project and I would appreciate any feedback. 

Till next time, keeping crafting!

Lorraine
:O)


Pink and Green

Pink and Green

The Global Design Project #140 this week is CASEing a project by a card crafter called Brian King.  To CASE = Copy And Selectively Edit.  When a project is CASEd you take what you like from the design and make it your own.  This might be the actual stamp set, the colours, the layout, the theme or the images.  Whatever you like that has inspired you make your own card.  Below is the project from Brian King that is to be CASEd.  

So when I looked at Brian King's design the first thing that struck me was the colour combo that he had used: (Green, White, Pink and Black).  So that is what I decided to use in my card design that is photographed below.


So to create my card design I first started off with a Green and Black card base (5 3/4 x 4 1/8"), the black floral image was already printed on the Green card stock.  I then cut a Black card stock layer with my trimmer (5 3/16 x 3 9/16") and rounded the corners (1/4") with my Crop-a-dile.  I was being frugal with my card stock so I punched 5 scalloped circles to use on future project because you will not see the holes left underneath the White card stock.  I next cut a White card stock mat                   (5 1/16 x 3 7/16") and rounded the corners with the (1/2") blade.  I cut a piece of Pink patterned paper (3 7/16 x 2 1/2") and rounded the bottom corners with the (1/2") blade as well to match the White card stock.  

Next I got out my Big Shot and die cut the beautiful patterned shape to separate the White and Pink colours on the front this is from Stampin' Up "Petals and More" thinlits dies.  I adhered this to a (1/4") strip of Black card stock that had been trimmed off whilst cutting the Black layer.  I had previously stamped some of the images from the stamp set "Petal Palette" from Stampin' Up and had these saved in my box; so I took one of the small flower die cuts to put inside the card (to continue the theme) and I had a    (4 1/4 x 3 1/4") White oval already die cut as well to go inside the card too.  

Now for the stamping - first I stamped the sentiment "Thank You FOR EVERYTHING" (which came from the same stamp set) on the bottom right-hand side of the Pink patterned paper.  Then I stamped the large floral image on the top left-hand side of the White card stock.  To continue the theme onto the envelope I stamped the same image that was inside the card onto the envelope too.  I also whilst stamping with my Memento Black ink stamped the sentiment "Happy Mail" and the image of the duckling delivering the mail onto the envelope which helps the recipient of my card know that they are not getting a bill!  Stamping complete.

Then with my Spectrum Noir Alcohol pens (JG1, JG2, JG3, PP1, FS6, FS8) I coloured both the floral images.  The leaves green and the flowers pink.  I always start with my darkest colour to lightest and then go back to the darkest to blend the colours together.  I was really pleased with the colour match of the pink to the patterned paper.  The green could have been a little lighter but I liked the finished look.  

The next stage was to put my card together, everything was adhered flat with either wet glue or snail adhesive apart from the Black card stock layer which I put on foam pads to give the card a bit of dimension.  To finish off my project I added (x3) pink pearls to the front.  

I would love to know what you think of my project, so please leave me some feedback on my blog page thank you.

Until next time, keep crafting!

Lorraine
:O)


Week 3

Incredible Like You (2) Second set of 4 cards created from the card kit from Stampin' Up 'Incredible Like Y...